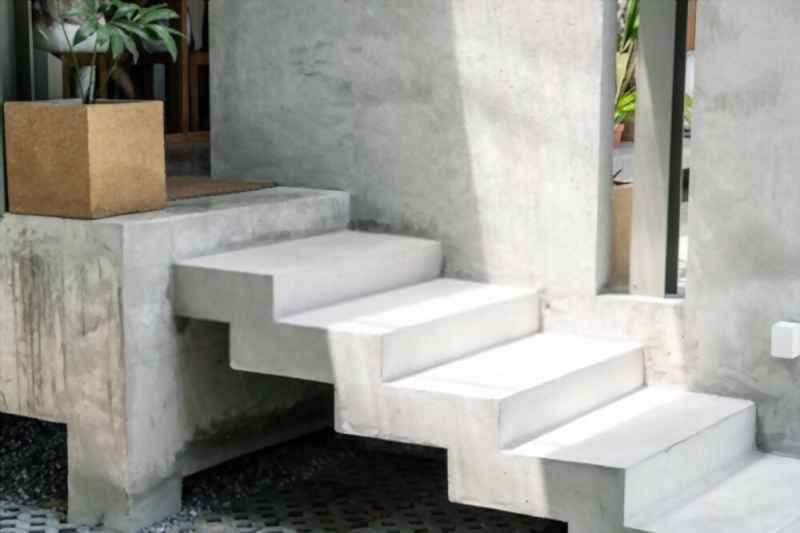
Forming concrete steps with sidewalls might be quite concerning. Because one simple mistake might cause a tragedy to the form of the steps which will result in a disastrous look and a structural breakdown. As we want you to avoid such outcomes for the concrete steps, you’ll need to follow proper guidance for it. So, how to form concrete steps with sidewalls?
Start by learning the basics of the steps and measure the dimensions needed. Calculate the number of stairs, find the height and depth of tread, the height of the riser, and the length of stringers. Then, mark all the measurements that you did. After that, cut and place the wooden form in places. Don’t forget to lubricate the whole wooden form. Next up, pour the concrete in the wooden form and when the concrete dries a bit, pull the wooden pieces out one by one. Lastly, give it the desired finishing you want.
If that sounds worthwhile for you, let us guide you through this challenging project today.
Grab These Essentials
Quality tools are very crucial when it comes to home DIY projects. Even though professionals can handle any situation even if it comes to a tool breaking while in the process, not everyone can do that.
However, here are the essential tools that you need to grab before you start this DIY projects-
Tape Measure
If you want to measure anything on the go, a flexible ruler a.k.a the tape measure is what you need. A ribbon of cloth, plastic, fiberglass, or metal strip with linear-measurement markings, these are the things that you’ll notice with a tape measure.
- We Recommended: SINGER 60-Inch Tape Measure (Link from Amazon)
Table Saw
A table saw is basically a woodworking tool that will help you cut the wooden boards that’ll support the concrete of the steps. They are very easy to use and quite effective too.
- We Recommended: DEWALT 10-Inch Table Saw (Link from Amazon)
Nail Gun
Nail guns are used to put the nails into places with the slightest effort that means by just pushing a trigger. They are more effective than a hammer and you can use them to nail the wooden boards.
- We Recommended: WEN 18-Gauge 3/8-Inch to 2-Inch Nailer (Link from Amazon)
How To Form Concrete Steps with Sidewalls
If you’re an inexperienced DIYer without any knowledge of the working of concrete, no need to worry because we’ve organized all the steps as easy-going as possible for you.
Proper planning and implementation are what you need for the concrete steps and we’ll show you how it’s done-
Step 1: Learn The Basics
There’s a certain geometry that you need to follow to construct the stairs with the sidewalls.
And if you mess up that certain geometry, you’ll mess up the whole form of the concrete steps big time.
So, there are some things that you need to know before you start planning.
You see, each of the steps consists of 2 main parts known as the riser and the tread. The riser is the vertical part of the step and the tread is the part you step on.
There’s another term known as the pitch line. It’s an imaginary line that runs from the lip of the bottom stair to the lip of the topmost step.
Moving on to the rise. It’s the total height of your staircase from its base to the topmost step.
Then comes the run of your stairs which is the depth of your stair measured from the front of your staircase to its back.
Lastly, the stringers of your stairs. These are the side supports to either side of each step. In this case, the sidewalks are your side supports.
These are some pretty important terms that you need to know in order to form the concrete steps with sidewalls.
Step 2: Measure The Dimensions
At the beginning, you need to find the total rise of your stair that you’ll build. You can measure the total height from the planned base to the higher level you’re building up to.
So, now you need to measure the run of the steps by finding the distance between the frontmost and backmost part of the stair.
Then measure the distance between the leftmost and rightmost bounds of the planned steps to find the width of your stairs.
Step 3: Calculate The Number Of Stairs
Now let’s do some calculations. You’ll need to calculate the number of stairs that you need that’s why.
Find out the rise of your stairs and divide the number by the rise height. 6 to 8 inches is the measurement of standard risers.
There might be a building code in your state for the maximum riser height. So, be sure to check that out because we don’t want to violate any building code.
However, if the calculation turns out as a decimal, round up to the next whole number.
You might also find many online sites that offer simple step calculators to simplify this process more for you.
These types of calculators are able to help you find out the exact specifications of your steps.
Step 4: Find The Height and Depth Of Tread
When you need to determine the height and depth of your tread, remember that the depth of each tread is a little more flexible.
However, each of those should be at least 11 inches to put up with both large and small feet.
Step 5: Find The Height Of The Riser
To find the height of the riser, you need to divide the total rise of the whole staircase by the number of risers.
In general, you should consider rounding up the riser height of your steps to the nearest 1/16 inch.
Step 6: Find The Length Of Stringers
As you’re forming the concrete steps with sidewalls, the sidewalls are supposed to work as the stringer of your concrete steps.
Let’s find out the length of the stringer now. Multiply the total rise by itself and then multiply the total run by itself.
Next up add the rise multiplied by itself and the run multiplied by itself together.
Then, take the square root of that certain number and find the angle of your stringers by taking the inverse sine of your total rise divided by the length of the stringers.
Step 7: Mark All The Measurements
Now it’s time to start the groundwork. First, you need to start by marking the base of the steps. You can use thin ropes and a couple of sticks to mark the base correctly.
Next, mark the length of stringers on your sidewalls. In other words, you can mark a 2D dimension of the steps on the sidewalls to place the step perfectly.
Step 8: Cut and Place The Wooden Form
Now, this is where the real part is because till now all the steps were just about the correct measurement.
So, you need some pieces of wooden boards that are durable enough and cut them according to the width of the steps. You can use a table saw to cut the wooden boards in the shortest time.
These boards will create support for the concrete to turn into steps. So, cut as many pieces you need according to the number of steps that you’ll be creating.
Now place them vertically at each step and use nails to create support for the concrete that you’ll pour soon.
Step 9: Lubricate The Frame
You can use old used engine oil from your car and lubricate the wooden frame.
You see, there’s a high possibility that the concrete will get stuck with the wood if it’s not lubricated.
However, when it’s lubricated the oil doesn’t let the concrete set on the wooden frame even though it keeps the concrete in place.
Step 10: Pour in Concrete
If the forming is done, it’s time for you to pour the concrete in the hollow places in the frame that you’ve created with wood.
Make sure that you’ve covered all the areas evenly. You can use a trowel to help you in this case. Let the concrete set for some time to become more strong.
Step 11: Pull The Wooden Form Away
Before the concrete sets totally into place, you need to take away the wooden frame from its place.
Be very gentle with this step because too much force might even pull out some of the concrete from the place.
Step 12: Give It a Finishing Touch
After all of the wooden pieces are removed, you give the step a finishing touch using a trowel. It’ll make the steps smoother when they dry.
However, if you wish to do creative designs on the steps, you can do that too.
You may also like:
Frequently Asked Questions
What’s the best mix for concrete?
The best mix for concrete actually depends on what strength you are trying to achieve, but as a general guide a standard concrete mix would be 1 part cement to 2 parts sand to 4 parts aggregates. However, if you’re thinking about the foundations, a mix of 1 part cement to 3 parts sand to 6 parts aggregates can be used.
Is it OK if it rains after pouring concrete?
It’s quite okay if it rains after pouring concrete because even if it starts raining after a concrete pour, the potential for damage may not be that serious. However, the rainwater might cause a little damage if you had time to complete the finishing process and the concrete has stiffened (typically 4 to 8 hours after mixing).
Conclusion
A home DIYer with the knowledge of how to form concrete steps with sidewalls is no one but you now.
However, you need to make sure that you’re wearing the proper dress to work in when you’re starting this whole process. Because working with concrete might get a bit messy at times.
Nevertheless, if you mess up by any chance, don’t freak out because there’s always a solution. So, best of luck building your own concrete steps today.