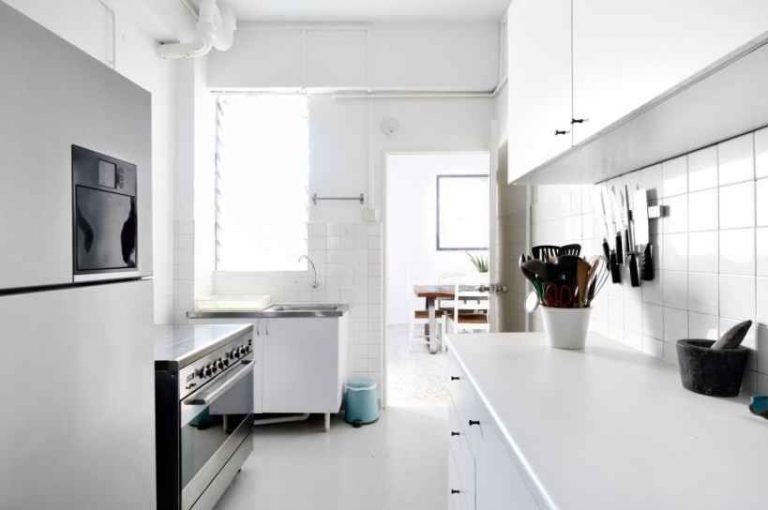
Your cabinets are one of the most essential parts of your kitchen. They give you a lot of storage to hide your stuff and make your kitchen look more decorative.
And if your cabinet door is damaged somehow, well the kitchen decoration will look bad. Also, this extra damage might cause frustration for you.
So, if you’re looking for how to repair water damaged cabinet doors, then we are here for you today.

What’ll you get from us?
Well, we’ll show you why your cabinet door might be damaged, how you’re going to repair your cabinet door and what you’ll need for that. Also, we’ll show you what options you have and everything you need to know today.
Let’s not wait any more, shall we?
How Can Your Cabinet Door Get Damaged?
Water is like poison for your cabinet. Especially when you have a leaking sink for a long time. You see, your water line or sink is the reason for the damage most of the time.
Here’s the thing.
Most of the kitchen cabinets are plywood made. Well, plywood is strong and lasts for a long time. But do you know the worst side of it?
Unfortunately, your plywood is vulnerable to water, mostly water. However, if your cabinet door is made of it, then it’s in danger.
Slowly leaking pipe, overflowing sink, and other jammed water are the reasons for damage to your cabinet door. You see, slowly leaking water slowly runs through your wood, and over time it damages your door.
And how’ll you know it? Well, the veneer swells and crumbles. Also, often the water also causes damage to your cabinet bottom. In that case, you’ll need your cabinet bottom repair.
What Do You Need to Start?
Well, after you notice your water rotting your cabinet door, you’ll need to check if any other part of your cabinet is damaged or not. You might have water all around the kitchen cabinet and you might need a whole cabinet repair.
Next, you’ll need to gather the tools for you to work on your cabinet door.
Tools
The tools that you’ll need are:
- Screwdriver or Electric drill (Link from Amazon),
- Electric sander or Sandpaper (Link from Amazon),
- Paintbrush (Link from Amazon),
- Putty knife (Link from Amazon),
- Dust mask (Link from Amazon),
- Vacuum cleaner or Tack rag (Link from Amazon),
Materials
Look,
You’ll need quality materials to fix your doors because you don’t want your doors to be weak in the future. Besides, it might even break in the future if you use anything cheap.
Remember, quality should always be the first priority.
So, the materials that you’ll need are :
- Wood stain
- Varnish
- Epoxy resin & hardener
If you grabbed all the materials and tools, it’s time to show you how you’re going to repair your cabinet doors.
How Will You Repair Your Cabinet Door?
Are you a handyman? Well, we guess not.
If you’re not, then here’s what you’ll need to do. You’ll need to follow these steps if you want to repair that water damaged door of your cabinet in no time.
Step 1: Inspect the Level of Damage
First things first. You’ll have to see the areas which were damaged on your door. Well, you’ll notice two types of damage. Minor and major.
You might be wondering, how would you know when it’s minor and major.
We’ll show you how. So, in minor cases, you’ll feel the water on the door rather than seeing it. That means your door is not yet highly damaged. However, you’ll need to find the water source and stop it from leaking as soon as possible.
On the other hand, you’ll feel that your door is very weak and sponged with water. Well, that might be a major case. In that case, there’s a high chance that the wood of your door is rotten.
However, you’re more likely to change your door with a brand new one if that happens.
Step 2: Detach Your Cabinet Door
After inspecting the damage you’ll need to detach your door from the whole cabinet. You’ll need a screwdriver or self-drilling electronic drill to unscrew the screws.
You don’t want a broken door. Do you?
Well, then make sure to unscrew the hinges of your door carefully. If you have European-style hinges, then you might have a built-in adjustment set-up.
However, they are the same as the normal ones so you’ll have no problem detaching them.
Step 3: Dry Your Doors
Here’s the thing.
Before you start working on your door, you must dry it. Because you can’t really sand your door without drying it.
Well, do you know the most effective way to do that? Air movers and dehumidifiers. Fortunately, they’ll dry your door faster and better.
On the other hand, you can also use regular house fans too. But it’ll take longer in time. Here’s a tip for you.
Dry as long as you can. Because if it’s properly dried, you can sand them perfectly.
Step 4: Sand Your Doors
What does sanding your doors mean? Well, basically it’s a process that’ll remove defects from the wood surface. Now, you’ll have to sand the cabinet doors using an electric sander.
However, if there’s any loose veneer or stuff on your door, you must get rid of it. You can’t sand the door properly with unnecessary junk on it.
Moreover, you’ll have to start sanding with the corners and grooves. If you use sandpaper, there’s a downside. It’ll take more time and effort.
And you know, “Time is moneyâ€. So, you wouldn’t want to waste too much time.
However, you should use an electric sander and then give a finishing with a sanding sponge. Because it’ll look way better than before if you give it a finish by hand.
Step 5: Clean Dust
You see, the sanding creates a lot of dust for you. You might have to use a vacuum cleaner to clean the dust.
However, you can also use tack rag. What’s a tack rag you ask?
It’s a sticky rag that picks up even the finest dust. You might also be wondering, where to find it? Well, you’ll find it in any paint store.
Also, don’t forget to wear your dust mask while you’re doing your sanding.
Step 6: Apply Wood Stain
Grab your brush.
Why?
Because you’ll have to apply your wood stain on the door. Now, how to stain wood?
Well, you’ll have to apply stain to the surface of your door and wait for 5 to 10 minutes. After that, you need to wipe it off with a clean and lint-free rag.
Then? Well, you’ll have to wait for the stain to dry. So, let us tell you what stain does here while you dry.
You see, stains main purpose is to color the wood. But there’s more. It offers your wood certain protections as a result of coloring and absorption of it deep into the wood.
Simply put, it’s like a fairness cream protecting your wood from aging. However, we recommend that you wait 24 hours at least for the stain to dry.
Step 7: Apply Varnish on Door
There’s a reason why we recommended 24 hours to dry the stain. Because you’ll have to varnish the wood after you stain it.
If the stain blends with the wood perfectly you’ll have nothing to worry about.
What’s varnish? Well, it’s a hard protective transparent finish. Now, if you’re varnishing both sides of the door, you’ll need to wait for about 8 hours between them.
However, we recommend you to apply two coats of varnish. Moreover, you can use either a sprayer or a high quality brush for varnishing.
Another tip for you is that you should sand the cabinets lightly between coats. It’ll give you a more smooth and durable finish.
Step 8: Put Everything Back
After you are done varnishing, you’ll have to dry the doors again and then put your door at its place.
Now, screw your door with the hinges and check to see if there’s any problem with the fitting. Also, be sure to screw it properly so that it doesn’t get loose any soon.
Another important thing. Check your water line again before you put your doors in place. However, you don’t want to damage it again.
Tips for You
As you’re no handyman, we arranged some tips for you to keep in mind. Here they are.
- You see, it’s better for you if you do the repairing outdoors. Because the dust can cause you problems. However, if you’re doing it inside of your house, make sure to use fans for ventilation and use a dust mask.
- Next, keep your screws and hardware together. You don’t want to lose any of them.
- If you need to take down both of your cabinet doors, make sure to mark your doors with a marker. You can’t misplace the doors.
- You need to discard your oily stain rags in a bucket of water. After they dry in the water, you can put them in the trash. However, you should never put them in trash directly, because the build-up fumes can cause continuous burning.
Wrapping Up
How to repair water damaged cabinet doors? By now you should know that it’s not really hard. However, it doesn’t matter if you’re a handyman or not you can do it yourself.
But here’s the thing.
You see, professional handymen are called professionals for a reason. Because they are good at it and they know how to finish your work perfectly. So, calling a professional is always a better option for you.
However, if you’re going to do it on your own, don’t forget to follow these easy 8 steps.
Good luck…